Video Calling App: Dyte REST APIs

Thanks to Rohit Khirid for this pic, a pro mobile developer!

This is Part II of the Video Calling App blog series. You may want to check other posts on the main blog post here.

There are two parts to Dyte. The SDK and the API. SDK is about integrating the Dyte infrastructure in the front-end or UI of the application, and API is communicating with the Dyte infrastructure.
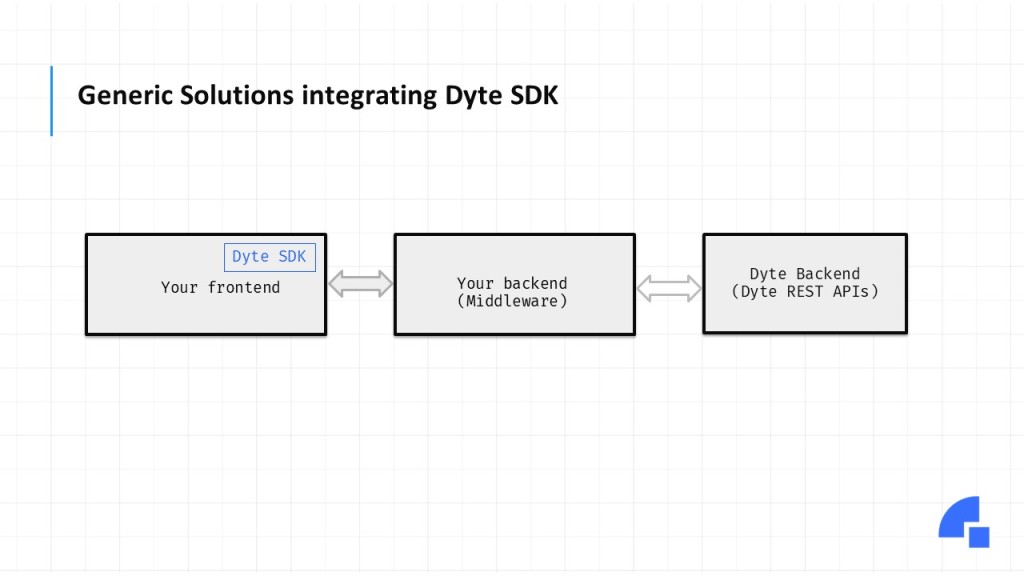
The first step in integrating Dyte into any app is to call the Dyte REST APIs. This allows the app to communicate with Dyte infrastructure. We’ll focus on the APIs in this post and cover SDK in our front-end post.

Before going deep into APIs, let’s figure out some concepts around Dyte.

Dyte Concepts
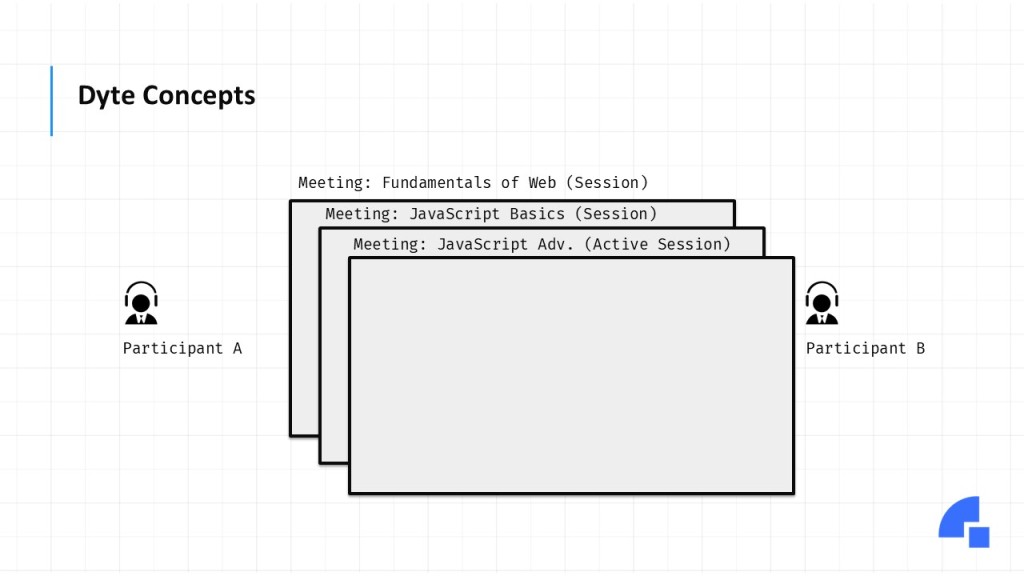
Let’s assume we’re building an online classroom application. We’ve 2 participants, Participant A, who is a teacher, and participant B, who is a student.


When a teacher and students want to join an online class, say the class is about Fundamentals of Web, we create a meeting. So, a Dyte meeting is an event where one or more participants meet.


Similarly, there could be different classes happening every day. For example, Javascript Basics and Javascript Advanced. Each of these meetings, which are already happened or been completed in the past, is called as session whereas the meeting happening right now is called as active session.


When participants join these meetings, they join with a preset. Presets are simply a set of permissions and UI configurations that would be applied to a participant. Each meeting has one or more participants. You must pass the preset when adding participants. For example, a student attending a class cannot mute other students, but a teacher can. Similarly, while some participants cannot share the screen, the person who created the meeting can. A preset specifies how the UI will appear and which permissions or features are available to that participant.


The last concept to understand is the difference between Group Call, Webinar and Live Streaming. All are meetings. However, the main difference is the user flow; a group call is a many-to-many interaction, whereas a webinar is a one-to-many interaction. Webinars also have the concept of stage and audience, with only those on stage being streamed to everyone. The audience can request to be on stage, or the host can add people to the stage.
Lastly, one can live stream the meeting to hundreds and thousands of users. By creating a live stream for a meeting.

Calling Dyte REST APIs

To call the REST APIs, you must first get Organization ID and API Key from Dyte Developer Portal. Navigate to the API Keys section and copy those values.

To call v2.0 APIs, you need to Base64 encode username:password, here username is Org ID, and the password is API Key. You can use any online tools.

Let’s try calling Create Meeting API.

curl –request POST \
–url https://api.cluster.dyte.in/v2/meetings \
–header 'Authorization: Basic ZGJhOWFhZTMtNGU4ZS00MDY3LTgyZjktMWYzMzRkMGQ3YzQwOg==' \
–header 'Content-Type: application/json' \
–data '{
"title": "title-of-the-meeting",
"preferred_region": "ap-south-1",
"record_on_start": false
}'

If everything is all right, we should receive the HTTP code 201 with the meeting ID:

{
"success": true,
"data": {
"id": "497f6eca-6276-4993-bfeb-53cbbbba6f08",
"preferred_region": "ap-south-1",
"record_on_start": true,
"created_at": "2019-08-24T14:15:22Z",
"updated_at": "2019-08-24T14:15:22Z"
}
}

We can add participants to this meeting by calling Add Participant API.

curl –request POST \
–url https://api.cluster.dyte.in/v2/meetings/meeting_id/participants \
–header 'Authorization: Basic ZGJhOWFhZTMtNGU4ZS00MDY3LTgyZjktMWYzMzRkMGQ3YzQwOg==' \
–header 'Content-Type: application/json' \
–data '{
"name": "Mary Sue",
"picture": "https://i.imgur.com/test.jpg",
"preset_name": "string",
"client_specific_id": "string"
}'

Note that we must pass meeting_id on this request, which we received in the previous response.

Once the meeting starts, we can get an active session, and then we can perform actions like muting participants, kicking out participants, etc.

{
"success": true,
"data": {
"id": "813432c7-3c5a-45e2-9acf-eef7061c7584",
"associated_id": "6bf2b8be-04dd-4191-b602-1128921a306b",
"type": "meeting",
"status": "LIVE",
"live_participants": 1,
"max_concurrent_participants": 2,
"minutes_consumed": 2.3434,
"started_at": "2022-01-12T14:21:34.388Z",
"ended_at": "null",
"created_at": "2022-01-12T14:21:34.398Z",
"updated_at": "2022-01-12T14:26:00.784Z"
}
}

As you can see, different APIs are available to start, stop and manage the Dyte Meeting. It is essential to understand these APIs before starting the Dyte integration.

In the next blog post, we will create a backend project with our own business logic.

Till then,

Happy coding :)

Namaste,
Mayur Tendulkar

Video Calling App: The Architecture

Thanks to Akshay Gugale for this picture, a fantastic designer.

This is Part I of the Video Calling App blog series. You may want to check other posts on the main blog post here.

To build this video calling app, we’re not going to reinvent the wheel of WebRTC and audio/video communication. Instead, we will use Dyte SDK. Dyte is a Software-as-a-Service that provides an abstraction over WebRTC communication with some added features that take away our headache related to scaling and managing infrastructure resources required for a typical WebRTC call.

Ideally, we can build a single web app using any framework and get away with it. However, to make our application a little more secure, better to scale, and easier to manage, we will build it in 2 parts: (1) a Backend and (2) a Frontend. Otherwise, how would we be able to authenticate attendees with our own system and provide access to them depending on authorization?

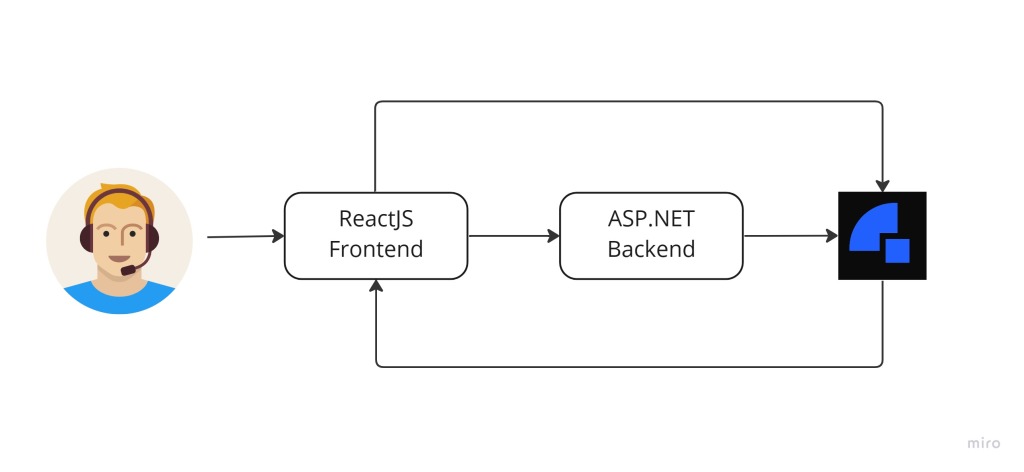
This is not an architectural diagram, but our application will look like this:

Now, let’s explore the components of this solution.

Backend (or Middleware)

In our app, the backend (or middleware) aims to handle all logistical tasks such as user management (registration, login, password reset, account closing), meeting scheduling, listing recording, etc. It will also help us build our logic based on Dyte REST APIs. For example, Dyte API allows adding participants to the call, but who should be able to attend the call will be our responsibility. Our Backend APIs will help us to manage that aspect.

There are various options to write this backend. For example, one can write the services in JavaScript using NodeJS and Express or write them in Java.

I will write this middleware/backend as ASP.NET Core Web API using C#. It has been a while, and this will give me a chance to revisit my old territory :)

Irrespective of the language, and framework, the flow will remain the same.

Frontend (or App)

A new JavaScript library is released almost daily to make it easy to build stunning web apps. In our case, we are going to use ReactJS. Just because I am new to React, and I believe it is FAST! You can choose Angular, Vue, or plain vanilla JavaScript as well. Dyte has SDKs for almost every platform. Check it out here.

Again, the flow will remain the same irrespective of the language and framework.

Okay, but what is the flow?

A typical flow for a video app is someone creating a meeting or initiating a call and another person joining that meeting or call. However, there are a few steps in between when it comes to implementation. Let’s understand those.

Step 1: Create a Dyte account: This will give us the required credentials.

Step 2: Call Dyte REST API: Create Meeting

Step 3: Call Dyte REST API: Add Participant

Step 4: Join the meeting

Step 5: Inviting someone to the call

Step 6: Repeat Steps 3, 4 & 5

Once the meeting is created, and the participant is added, the front end directly talks to the Dyte infrastructure to manage the call. The backend can still communicate with Dyte infrastructure through REST APIs and subscribe to events using Webhooks.

Dyte REST APIs (Dyte Backend)

Our backend will call Dyte REST APIs to create a meeting and do various operations around it. Dyte REST APIs and Dyte SDKs are the backbones of our application, and we shouldn’t be exposing those directly through our app. That’s why we introduced middleware.

Other Components

There are still a few more components to this app that I am not showing at this moment to avoid getting overwhelmed. For example, we will be using Table Storage to store meeting information, for example, who is invited and who has access to the meetings. We will also be using third-party authentication services to make sure only invited users are authorized or allowed to join the meeting. We’ll cover those services when we get to the point where it is necessary to talk about them.

I am excited about this project. Are you?

Let’s meet next week to talk about Dyte REST APIs and how to call those.

Till then, happy coding :)

Namaste,
Mayur Tendulkar

Let’s build a video calling app!

Thanks to Kunal Chandratre for this photo! I was lucky to capture this candid moment when Kunal was on a video call with his kid.

From wired telephones, where we had to tell the number to the operator to connect us, to mobile phones, where we ask Siri or Ok Google to connect us, we have come a long way!

The quality of the phone call has changed a lot, too, from audio-only to video and plugin-enabled calls. Remember the “background blur”?

Let’s build an app that will allow us to connect with our dear ones on video calls. And integrate some cool features. From scratch!

Introduction

Post-pandemic, video calling usage skyrocketed as video calls have provided us many opportunities. Think about students attending online classes, patients consulting online with doctors, executives giving presentations to customer leads, instructors taking online gym sessions – everything through video calls.

There are already a couple of solutions for video calling. However, there are challenges worth noticing.

Need to install 3rd party solutions

Some solutions allow users to download an executable to join the meeting. However, with this approach, the user has to leave the context and join the meeting.

Lack of branding and identity for the host

Think about hospitals providing online consulting services. I’m sure those hospitals would want to keep their brand identity, like logo, color scheme, and aesthetics, which will make patients feel comfortable sharing vital information.

No granular control over calls

In the same hospital example, doctors may want to record the call and make it mandatory that only 1 patient is available at a specific time slot in the meeting, and there shouldn’t be a chat option. There are various permutations and combinations of permissions depending on roles.

Data Storage & Compliance

When it comes to hospitals, patient data needs to be kept secure, and in some countries, the law of the land requires that data be stored within the country.

I’m sure many other industries like EdTech, E-Commerce, Tele Health, and Communication would have requirements around these challenges.

Meet Dyte!

Dyte is an SDK that allows embedding video calls into our existing apps or building apps around them. The user doesn’t need to download anything or leave the leading app for video calling functionality when integrated. Similarly, as the video call is embedded into the app, the app gets to keep the branding and identity. With Presets, Dyte provides a way to control every video call feature, e.g., screen sharing, muting, kicking out participants, recording, etc. And last but not least, Dyte is just video SDK. Authentication, data, and logs are on to the developer to store and manage. So, data storage and compliance requirements are straight forwards.

I thought about building an end-to-end video calling app from scratch using various technologies, and here it is.

Hosted Meetings

With frequently asked questions from the community and my personal requirements, I thought about building ‘Hosted Meetings.’ I am considering the following bare minimum requirements for this product:

  • A web app that can run on desktop, laptop, and mobile devices.
  • It should be protected with Google/Microsoft-like authentication mechanisms. Perhaps provide the additional 2FA/MFA layer.
  • Users should be able to create meetings, invite other users and join meetings. These users can join from any device.
  • Meetings will be recorded, & past recordings will be shared with attendees. Users should be able to browse through recordings.
  • The user should be able to track attendance on the call.

Building such an app from scratch would be a herculean task for a one-person team. So, I will break this into the following pieces and work on it over the next few weekends. If you feel something needs to be covered here, do let me know in the comments.

At the end of the series, people should be able to pick the source code and build and deploy the solution for themselves. We’ll cover different deployment options.

I’m going to share the entire source code and sample here on GitHub: https://github.com/mayur-tendulkar/hosted-meetings

So, let’s get started!

Happy coding :)

Namaste,
Mayur Tendulkar